The Short Answer: No, Bonding Doesn’t Bleach
Here’s the blunt truth most articles dance around: peroxide-based whiteners cannot lighten composite resin. Period. Not Crest 3D White strips, not your dentist’s $400–$600 custom trays, not a $500–$1,000 in-office Zoom session. The chemistry doesn’t work on cured resin.
The reason is structural. Whitening agents like hydrogen peroxide and carbamide peroxide work by penetrating the porous structure of natural enamel and dentin, where they break apart the molecules causing discoloration. Composite resin is non-porous and inert once cured onto your tooth. Peroxide can sit on it all day and chemically, nothing happens to the shade underneath.
So why does the internet keep muddying this? Because there’s a real distinction between surface stain removal (coffee, wine, and tobacco film sitting on top of the resin — yes, a professional polish can lift that) and actual bleaching (changing the internal shade of the material — impossible). Some sources collapse those two ideas into one fuzzy “you can whiten bonding” claim.
Which means the question you need to answer isn’t “how do I whiten my bonding?” It’s “how do I fix the shade mismatch between my bonding and the rest of my teeth?” That’s a different problem with three real solutions — and that’s what the rest of this article walks through.
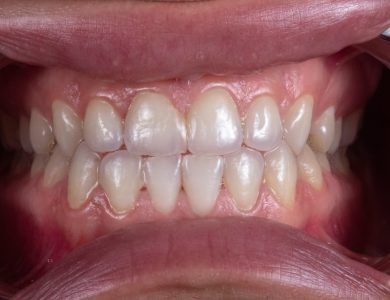
Why Your Bonded Tooth Looks Duller Than the Rest
Composite resin and natural enamel age on completely different timelines, and they stain through totally different mechanisms. So when your bonded front tooth looks “off” compared to the rest of your smile, you’re usually seeing two changes layered on top of each other.
Composite resin is porous on a microscopic level. Over a 2–5 year window, it absorbs pigment from coffee, black tea, red wine, tobacco, turmeric, and dark sodas. Unlike enamel, the staining sits in the resin matrix itself — not just on the surface — which is why a regular cleaning only brings back some of the brightness. The polish also wears down over time, leaving micro-rough patches that grab even more pigment.
Meanwhile, your natural teeth are doing their own thing. Enamel thins with age, the yellower dentin underneath shows through more, and surface stains build up. According to Consumer Reports coverage of cosmetic dentistry, most adults notice visible shade shifts within roughly five years even without heavy staining habits.
Quick self-check: compare a back molar to a front tooth in good lighting. If your molars look noticeably brighter than your bonded area, the resin has darkened. If your molars look about the same shade as the bonding, your natural teeth have yellowed around it. That distinction shapes which fix makes sense.
What Whitening Strips and Trays Will Actually Do
Here’s the uncomfortable math: a typical box of whitening strips runs $30–$55, and Consumer Reports has consistently flagged that peroxide-based bleaching agents only react with the organic structure of natural enamel and dentin — not with composite resin. So a two-week strip regimen will brighten everything except your bonded tooth. The bonding stays exactly the shade it is today.
That’s the “darker patch” outcome you’ve been worried about, and it’s not a fluke — it’s the predictable result. A bonded front tooth currently looking slightly dull next to your natural teeth will look noticeably darker after whitening, because the gap in shade widens by however many levels your enamel lifts (usually two to four on the standard VITA scale).
There’s a small caveat. The mild abrasive action and surfactants in strips and tray gels can lift surface stain sitting on top of aged composite — coffee, wine, tea residue. So the bonding might look marginally cleaner. But the underlying resin shade is locked in from the day it cured.
If you go ahead anyway, brace for a 2–4 week window where the mismatch is at its worst. Natural teeth rebound and re-darken slightly after whitening ends, so the gap narrows a bit — but it never closes.
The Timing Rule: Whiten First, Then Bond
If whitening alone won’t work, the order of operations matters more than the products themselves. Here’s the rule every cosmetic dentist follows but rarely explains to patients before the fact: whitening comes first, bonding comes second. The standard sequence — bleach your natural teeth to whatever shade you want, wait roughly two weeks for that shade to settle, then have the dentist mix and shape composite resin to match the new, brighter baseline.
That two-week buffer isn’t arbitrary. Teeth rebound a half-shade or so after bleaching as they rehydrate, so a match made on day one will look off by day fourteen. There’s also a chemistry problem: residual peroxide in the enamel interferes with the adhesive bond, and according to guidance echoed by the American Dental Association, composite placed too soon can fail prematurely or discolor at the margins.
If you already have bonding, you’re running the playbook backwards — which means you have two honest choices. You can match new bonding to your current tooth shade and accept the smile you have now, or you can whiten your natural teeth first, wait the two weeks, and then replace the existing resin to match the brighter result. There’s no shortcut that lifts the old composite along with the enamel.
How to Choose Between Your Three Real Options
The right path comes down to three honest questions: how much you want to spend, how visible the tooth is, and whether you were planning to whiten the rest of your smile anyway.
Option 1: Replace the Composite ($150–$400 per tooth)
The cheapest fix and the one most general dentists recommend first. Your dentist removes the old resin and rebonds with a fresh shade matched to your teeth — whitened first, if that’s the plan. Composite bonding typically lasts 5–7 years and works well for small chips, minor gaps, or a single discolored spot. The trade-off: it’ll stain again over time, especially if you drink coffee, red wine, or tea daily.
Option 2: Upgrade to a Porcelain Veneer ($900–$2,500 per tooth)
According to Consumer Reports surveys of cosmetic dental pricing, porcelain veneers run roughly three to six times the cost of composite but last 10–15 years and resist staining almost entirely. This is the move if the tooth is front-and-center in every photo, you’re past your second round of composite, or you simply want to stop thinking about it for a decade.
Option 3: Polish and Shade-Blend ($200–$600 total)
If the bonding is less than two or three years old and the mismatch is mild, ask about a professional polish to strip surface stain from the resin, followed by supervised tray whitening to lift your natural teeth toward the bonding shade. No replacement, no veneer — just a shade reconciliation. It only works when the bonding itself is structurally sound and the color gap is small.
What a Dentist Can Do That At-Home Products Can’t
Here’s what justifies the chair time: a dentist has tools and materials that can’t be sold over the counter, and they’re using them on a surface (cured composite) that doesn’t respond to peroxide.
The first thing a hygienist or cosmetic dentist can do is a professional polish using a fine-grit prophy paste followed by aluminum oxide. That two-step polish lifts the coffee, wine, and tobacco stain embedded in the top micro-layer of the resin and restores the original gloss — something a charcoal toothpaste or whitening strip physically cannot do without scratching the surface further.
Then there’s shade matching. A dentist uses a Vita classical shade guide or a digital shade scanner (like the VITA Easyshade) to read your enamel within a fraction of a shade. You can eyeball your own teeth in the bathroom mirror all day; you won’t replicate that accuracy.
If whitening is part of the plan, custom-fitted trays with 10–22% carbamide peroxide gel give far more predictable results than drugstore strips, because the gel sits flush against enamel instead of sliding around. A 15-minute cosmetic consult typically runs $50–$150 in most US markets.
Red Flags: When Replacement Is the Only Real Fix
If you’re seeing any of the signs below, polishing and shade-blending are a waste of money — you’re paying to delay a replacement you’ll need anyway.
- Your bonding is 5–7+ years old. Composite resin has a working lifespan of roughly 5–8 years, according to the American Dental Association. Past that window, the resin has absorbed pigments deep into its matrix and lost surface integrity. A polish might brighten it for a week or two, then it dulls right back.
- You can see chipping, rough edges, or a stained “halo” along the margin. That dark line where bonding meets natural tooth is marginal leakage — bacteria and pigment have crept under the resin. No surface treatment reaches that.
- The bonding has turned grey or brown, not just yellow. Yellow is usually surface staining from coffee, tea, or wine. Grey or brown signals deep chromogenic penetration or underlying decay, and it won’t lift.
- You already whitened and the mismatch is glaring. Once your natural enamel is two or three shades brighter than the resin, no polish closes that gap. The honest fix is replacing the bonding to match your new shade.
Replacement composite typically runs $150–$400 per tooth; a porcelain veneer, $900–$2,500. Knowing which camp you’re in saves a frustrating dentist visit.
Your Next Step Before the Event or Photo
Pull up your calendar and count the days — that single number decides everything else.
If your event is under 2 weeks away
Book a professional polish only, typically $75–$150 depending on your market. Do not start whitening strips or trays this close to a deadline; you risk sensitivity, an uneven shade lift, and zero time to replace bonding if the mismatch worsens. A hygienist can lift surface stains from both enamel and composite in one visit.
If your event is 4–6 weeks away
Schedule a shade-match consult this week. Ask the dentist whether to whiten first and replace the bonding after, or just polish and replace.
If you have no hard deadline
Run the full sequence: whiten your natural teeth, wait at least 2 weeks for the shade to stabilize and rehydrate, then replace the bonding to match the new baseline. Reversing this order is the single most common reason people end up with a visible patch.
What to ask when you call
- How many shade-matched composite replacements do you do monthly?
- What’s your polish-only price versus a full hygiene visit?
- For my specific tooth, would you recommend composite or a porcelain veneer — and why?